Human Resources > Workforce Administration > Search > Employee > Payroll Data
Note: This section is available only if you are licensed to New World ERP's Benefits Administration module.
The grid in this section contains a snapshot of all active and future-dated benefit plan enrollment data that apply to the selected employee as of the date on the timeline. Each benefit plan the employee has selected corresponds to a row in the grid.
Rows are sorted alphabetically by Category-Plan, beginning with those that have coverage date ranges with Open end dates.
| Column | Description |
|---|---|
| Category-Plan | Benefit plan category and description. |
| Option | Coverage enrollment option selected, such as Employee, Employee +1, Family. |
| Coverage Dates | Time period of the benefit plan coverage. |
| Payroll Dates | Time period during which payroll deductions are applied to the plan cost. |
| Deduction Amount |
Employee's portion of the total cost of the plan divided by the Number of Payments set up for the plan, based on the pay group associated with the employee's primary job. A cell in this column contains data only if the Calculation Method for the plan is Flat Amount. For any other method, N/A displays. |
| Employee Portion | Employee's portion of the total cost of the plan, expressed as a dollar amount or a percentage, depending on the plan setup. |
| Declined | Shows a green check mark if the employee has declined the category-plan. |
| Overridden | Shows a green check mark if the default entries from the plan option in Maintenance have been overridden here. |
| Comments | Shows a green check mark if comments have been added to the Benefit Detail Section of a plan. |
On first navigating to this section, you see only the active, or open, benefit plans as of the date on the timeline and future-dated benefit plans that do not have records.
To view all of the benefit plans ever assigned to the selected employee, click the View All button, located on the right side of the Benefit Plans section header.
A grid populated with the basic data of the employee's benefit plan history displays below the section header, with each row corresponding to a benefit plan. Rows are sorted alphabetically by Benefit Category-Plan, from latest to earliest.
Note: Clicking on a marker in the timeline also refreshes the data in this section to reflect the corresponding effective-dated period.
Once the grid is in history view, the View All button changes to View Open. Click this button to return the grid to its original state.
To add a benefit plan to the grid in the Benefit Plans section, click the New button, located on the left side of the section header. The ![]() New Benefit Plan pop-up opens, asking you to select a Coverage Start Date, Category and Plan, with an option to Decline the plan and provide a Reason.
New Benefit Plan pop-up opens, asking you to select a Coverage Start Date, Category and Plan, with an option to Decline the plan and provide a Reason.
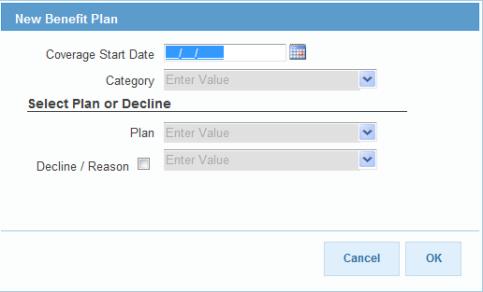
If you do not decline the plan, Coverage Start Date, Category and Plan are required.
The employee is enrolled and all categories are effective as of the Coverage Start Date. This date must be the same as or later than the Start Date set up in Maintenance for the Category selected on this pop-up.
The Coverage Start Date is used to determine the employment dates from the Employment tab and the benefit group, cycle hours or benefit exception from the Job tab.
To select a Category or Plan, click once in the field, and type the first few letters of the entry you want. A short drop-down opens, showing only the categories or plans that match, or most closely match, your entry. When you see the category or plan you want, click it to have it entered automatically in the field. You also may click the field prompt to select from a complete list of valid categories and plans that have been set up in Maintenance and are active as of the Coverage Start Date selected on this pop-up.
If a category you are expecting to see does not show on the drop-down, the employee is not eligible for the category, or the plans within the category are invalid.
The selection of a Category filters the Plan drop-down to include only the plans that are active for the Coverage Start Date and Category selected.
To make a plan not required, check the Decline box. Checking this box enables the Reason field and requires the selection of a reason.
After making your selections, click OK. The pop-up closes, and the Benefit Plan Detail section opens below the grid, containing the default entries of the benefit plan selected. The Coverage Start Date defaults the date selected on the New Benefit Plan pop-up, and the Coverage End Date is blank.
To edit a benefit plan, click the corresponding edit icon ![]() , located in the far-left cell of the appropriate row. The Benefit Plan Detail section opens below the grid, with entries enabled for editing. The fields and entries in this section are determined by the Category-Plan-Option combination in the selected row.
, located in the far-left cell of the appropriate row. The Benefit Plan Detail section opens below the grid, with entries enabled for editing. The fields and entries in this section are determined by the Category-Plan-Option combination in the selected row.
Note: If an existing benefit plan has been used in a payroll, or if a payroll containing the plan has been printed but not posted, the section opens in view-only mode, with a message saying the entries cannot be changed.
Enabled when a row in the grid is selected, the Create Event button creates a new coverage period and applicable details for the benefit category selected. Clicking the button opens a pop-up that asks for the Coverage Start Date and Plan of the new version of the benefit.
The Coverage Start Date must be later than or the same as the Coverage Start Date for the benefit category selected. Once you have selected the date, the Plan drop-down is filtered to contain only the plans that are valid during the effective-dated period of the category and that match the employee's eligibility.
Note: Gaps may not exist between sets of coverage dates.
Once the date and plan are selected and the pop-up closed, if the End Date of the original benefit category-plan was Open in the Coverage Dates column of the grid, its closed date shows as the day before the Coverage Start Date of the new category-plan, and the new category-plan shows the End Date as Open. The Benefit Plan Detail section displays in edit mode below the grid, and the Coverage Start Date contains the date selected on the pop-up.
The Payroll Start Date defaults to one day after the Last Used in Payroll date of the prior record. On save, the Payroll End Date of the prior record is set to the day before the Payroll Start Date of the new record.
Note: If an employee’s benefit plan detail is edited after the employee’s pay check has been calculated in a payroll, and if the edit date falls within the payroll date range, a warning displays, saying that proceeding invalidates the employee’s calculated payroll and requires it to be recalculated.
Enabled when a row in the grid is selected, the End Event button opens a pop-up that asks for the Coverage End Date and Payroll End Date of the selected benefit plan. Once the plan has ended, the benefit shows the start and end dates in the Coverage Dates column of the grid.
Associated deductions and benefits end automatically as of the Payroll End Date selected.
To delete a benefit plan from the grid, click the delete icon ![]() , located immediately to the left of the Category-Plan cell in the appropriate row. A dialog asks for confirmation that you want to delete.
, located immediately to the left of the Category-Plan cell in the appropriate row. A dialog asks for confirmation that you want to delete.
Only that particular effective-dated record is deleted.
Note: A benefit plan that has been used in a payroll cannot be deleted.
If multiple records exist for a benefit plan, the most recent displays. To view or edit the data associated with other records, click the arrows of the navigation control  , located on the right side of the Benefit Plan Detail section header.
The fields and selections in this section are determined by the Benefit Plan selected in the grid. The Amount, Percentage and Multiplier share one field, and the formatting and label of the field change based on the Benefit selected. The Limit field label changes based on the Limit Type set up on the benefit.
| Field | Description |
|---|---|
| Coverage Start Date |
Required. Date the benefit plan coverage becomes effective. It must be later than or the same as the Coverage Start Date of the benefit selected. The default entries, set up in Maintenance as of the date selected, populate the fields automatically. Note: Coverage dates cannot overlap. If the selected benefit plan has been processed in a payroll, this date is read-only. |
| Coverage End Date |
Date the benefit coverage ends. Note: This date cannot be later than the Coverage Start Date of a subsequent benefit record. |
| Category |
Required. Benefit category of the plan assigned to the employee. This selection filters the selections shown on the Plan drop-down. Only plans for which the employee is eligible are shown. This field is disabled when the Create Event function is used. |
| Plan |
Required. Benefit plan assigned to the employee. The selections on the drop-down are filtered according to the Coverage Start Date and the benefit Category selected. If the selected benefit plan has been processed in a payroll, this entry is read-only. |
| Option |
Enabled and required if Declined is unchecked. Benefit plan option assigned to the employee. The selections on the drop-down are filtered according to the combination of rule set and benefit group set up in Maintenance for the benefit Plan selected. A medical category has one plan set up called HMO. The grid on the Options tab of the plan contains two rows. The Rule Set of the first is Post 84 and the Benefit Group of the first is Salary. The Rule Set of the second is Pre 84 and the Benefit Group of the second is Salary. Based on this information alone, if an employee is not associated with the Salary Benefit Group, the Medical category does not show in the Category drop-down. If the employee is associated with the Salary Benefit Group, the rule sets are checked, as in the following example: Pre 84 and Post 84 are based on Hire Date; to be eligible for Pre 84, the employee's hire date would have to be before 1/1/84. To be eligible for Post 84, the hire date would have to be 1/1/84 or later. If the hire date is 8/12/2010, plan options are checked to determine which ones are available for the Post 84-Salary combination. If options have not been set up for this group, the Medical Category does not show in the drop-down. If options have been set up, the category shows. If the selected benefit plan has been processed in a payroll, this entry is read-only. |
| Enrollment Date | Date of employee's enrollment in the selected benefit plan. |
| Last Used in Payroll | Last date the benefit plan was applied to a payroll. |
| Payroll Start Date |
Required. If the selected benefit plan has been processed in a payroll, this date is read-only. |
| Payroll End Date | Ends the generated benefit and deduction, not the coverage. |
| Frequency |
Tells how often the deduction is applied to the cost of the selected benefit plan—for example, Every Pay, First Check of the Month. For the benefit plan and pay group associated with the employee's primary job, this entry defaults from the Payment Frequency tab on the Benefits Administration Plan Entry page in Benefits Administration Maintenance. |
| Declined/Reason |
Identifies whether the selected benefit plan has been declined. Checking this box enables the Reason field. Selections on the Reason drop-down come from the Benefit Plan Declined Reason validation set in Maintenance. If the selected benefit plan has been processed in a payroll, this data is read-only. |
| Comments | Accepts 1,000 characters. |
The Plan Cost grid is populated with the default annual and pay period benefit and deduction amounts or percents that have been set up in Maintenance for the combination of the benefit category, plan and option selected. You may use the fields in Employee Contribution column to override any of these amounts.
The Employee Deduction Amount must be less than or equal to the Pay Period Maximum specified in Maintenance. If the Employee Deduction Amount is greater than the Pay Period Maximum, a warning message displays on save.
The Employee Deduction Percentage must be less than or equal to the Election Percentage Maximum specified in Maintenance.
If a benefit plan selected for an employee has a flat amount calculation method and allows the selection of an employer contribution percentage (see Benefits Administration Plan Entry), an Employer Contribution Percent field displays in the Plan Cost grid.
Use this field to change the employer’s percentage of the total annual cost of the benefit plan. An entry between 0% and 100% (0.0000 and 100.0000) is required. Once you have typed the number, the Employer Benefit Amount and Employee Deduction Amount change in the table accordingly; for example, if the Total Annual Cost of the plan is $4,000, the Employer Benefit Amount is $3,000, the Employee Deduction Amount is $1,000, and you select an Employer Contribution Percent of 80.0000, the Employer Benefit Amount changes to $2,400 (80% of $3,000), and an additional $600, or 20% of the employer’s cost (20% of $3,000) is shifted to the employee, changing the Employee Deduction Amount to $1,600.
Total cost of health care is $4,944.36 per year, $412.03 per month. Of the $412.03, the city contributes $380, and the employee contributes $32.03. In one employee’s Benefit Plans section of Workforce Administration, an Employer Contribution Percent of 75.0000 is selected. As a result, the city would contribute $285 per month ($380 x .75), and the employee would contribute $127.03 ($412.03 - $285).
Total cost of health care is $4,944.36 per year, $412.03 per month. Of the $412.03, the city contributes $412.03, and the employee contributes $0. In one employee’s Benefit Plans section of Workforce Administration, an Employer Contribution Percent of 75.0000 is selected. As a result, the city would contribute $309.02 per month ($412 x .75), and the employee would contribute $103.01 ($412.03 - $309.02).
Since fully funded employees do not have a deduction with this plan, a deduction code would need to be set up if a percentage is applied.
Total cost of health care is $4,944.36 per year, $412.03 per month. Of the $412.03, the city contributes $380, and the employee contributes $32.03. In one employee’s Benefit Plans section of Workforce Administration, an Employer Contribution Percent of 35.0000 is selected. Although the math dictates that the city would contribute $133.00 ($380 x .35), and the employee would contribute $279.03 ($412.03 - $133.00), the city has agreed to pay at least $2,400 year ($200 per month); therefore, the city pays a minimum of $200, and the employee contributes $212 ($412.03 - $200).
If the Employee Deduction Amount changes, the existing deduction code ends.
When an incrementally based life insurance policy is selected as an employee's benefit plan, the columns of the Plan Amount grid display, from left to right, the Interval amount, Minimum amount and Maximum amount of the policy and the Override amount.
Use the Override cell to fill in the amount the employee is purchasing. Use the field located directly below the grid to fill in the life insurance Policy Number.
If the selected benefit plan has been processed in a payroll, these entries are read-only.
| Field | Description |
|---|---|
| Over-Age Catch Up |
Displayed if the Category is set up to allow Allow Over-Age Catch Up. Checking this box enables the Additional Amount field. Checking this box disables the Last Year's Over-Age Catch Up check box. |
| Catch-Up Amount | Additional dollar amount contributed if Over-Age Catch Up is selected. The amount cannot exceed the amount specified in Maintenance. |
| Annual Limit | Total amount of over-age catch-up dollars permitted for the year. |
| Last Year's Over Age Catch Up |
Displayed if the Category is set up to allow Allow Last Year's Over-Age Catch Up. Checking this box enables the Additional Amount field. Checking this box disables the Over-Age Catch Up check box. |
| Catch-Up Amount | Additional dollar amount contributed if Last Year's Over-Age Catch Up is selected. The amount cannot exceed the amount specified in Maintenance. |
| Annual Limit | Total amount of last year's over-age catch-up dollars permitted for the year. |
If the employee has dependents set up in the Contacts and Dependents section of the Workforce Administration Personal tab, the Dependents grid in this section contains a row for each, showing the name, relationship and coverage status. If applicable, cells also are provided for including the names of the primary and secondary doctors and the identification number. To select a dependent for enrollment in the plan, check the Covered box.
Note: This grid does not display if Track Covered Dependents is not checked for the benefit category containing this benefit plan.
Once a benefit plan has been processed in a payroll, the Covered box cannot be checked or unchecked.
Note: For health plans that are self-insured, dependent health coverage information may be updated at any time, regardless of whether the plans have been used in a payroll.
If a dependent is inactivated in the Contacts and Dependents section while enrolled in a plan, a warning message displays but does not prevent you from inactivating the dependent.
The number of dependents covered may not be less than the Minimum Dependents or greater than the Maximum Dependents specified on the Coverage Options Listing page in Benefits Administration maintenance.
The ![]() Leave Exchange section shows the rule set that applies to the employee, the employee's hourly pay rate and the annual and pay period exchange hours and exchange amounts.
Leave Exchange section shows the rule set that applies to the employee, the employee's hourly pay rate and the annual and pay period exchange hours and exchange amounts.
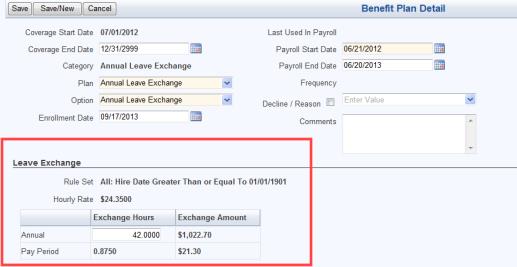
The exchange rate is the employee's pay rate at open enrollment (a set date every year).
| Field | Description |
|---|---|
| Hourly Rate |
As defined in Maintenance, employee's hourly pay rate from the primary job. |
| Annual Exchange Hours |
Defined in Maintenance, the maximum number of hours and employee may elect to exchange in a year. When you <Tab> off the field, the annual exchange amount, pay period exchange hours and pay period exchange amount populate the grid. |
| Annual Exchange Amount | The total exchange amount the employee may receive for the year, equal to the Hourly Rate multiplied by the Annual Exchange Hours. |
| Pay Period Exchange Hours | Number of hours exchanged each pay period. |
| Pay Period Exchange Amount | Payment amount exchanged each pay period. The dollar amount equals the employee’s hourly pay rate at the time of enrollment, multiplied by the number of leave hours being exchanged, divided by the number of pay periods. |
When enrolling an employee in a benefit credits plan, you have the option to display the cost of a health savings account (HSA).
- In the Benefit Plans section of the Workforce Administration Payroll Data tab, click New.
- Select a benefit credits category that includes an HSA.
- Click Save.
- Select Show Details.
- Click Calculate. The Benefit Credit Cost Details Report displays.
- If the health savings account is set up on the Associated Categories page of the benefit credit plan to use the shared deduction, the pay period deduction amount displays in the Benefit Credit section.
- When the sum of the shared deductions is greater than the available benefit credit, the difference displays as a deduction in the Pay Check Adjustment section.
- The pay period benefit amount displays in the Employer Cost section.
- When the benefit or deduction is a percent, it is not be included on the report.
In the top-right corner of the Benefit Credits enrollment page, the Pay Day Contribution section should reflect the employee cost and employer cost from the report.
If you do not want to save your entries, click Cancel. If you are satisfied with your entries, click Save. The benefit data updates, and if Create Event was used, the new effective date displays in the top-left corner of the Benefit Plan Detail section, directly below the section header.
To save your entries and clear the Benefit Plan Detail section for the entry of another benefit, click Save/New.
To assign user rights to the Benefit Plans section, follow these steps:
- Navigate to Maintenance > new world ERP Suite > Security > Users. The User List page opens.
- Select (highlight) the user to assign rights to the Benefit Plans section.
- Click Permissions. The Permissions page for the selected user opens, showing a grid of application components.
- Click the Show Search link in the top-right corner of the page. The Component Name, Application and Company Name search fields display.
- In the Component Name field, type Workforce Administration Payroll Data.
- Select the Human Resources Application.
- Click Search. The grid refreshes to show only the Workforce Administration Payroll Data components.
- In the Workforce Administration Payroll Data - Benefit Plans row, check the appropriate processes to assign the user.
- Click Save.
- For the authorization to take effect, the user must sign off and sign on the system.